SAP SD: How To Create Stock For Testing Purposes in SAP S/4HANA – A Step-by-Step Guide
This is a short article for any SAP SD consultant who has either configured an entire SAP system for practice and fun (imagine that!) or has created a new legal entity (new company code) in a live project. And everything in between.
Once you have created your Frankenstein’s Monster, so to speak, the next question is, can it walk? Meaning, can you write 1) a Sales Order, 2) a Delivery (including that all-important Post Goods Issue), and 3) a Billing document without any error whatsoever? If you can do all this, your set-up is correct from an SD point of view (with some help from the MM and FI modules). As they say, the proof is in the pudding.
Of course, there is more involved than simple configuration. By this, I mean you need to have suitable master data set up in your sales area. You will have created a new customer via tcode BP as well as a new material via MM01.
And then there is one last step.
The new materials that you intend to use in your Sales Order and Delivery must have stock levels north of zero. This will allow you to confirm your Sales Orders from an availability check point of view and then process the Post Goods Issue from stock. You see, if you have no stock, then your document flow will be stymied and you will be unable to proceed to issue your Billing document (where some FI bugaboos await you – but we are getting ahead of ourselves with Billing).
The point of this article is to create the stock in your S/4HANA system so that you can test your SD Order to Cash flow from Sales Order through Billing.
So, once you have done all the config and created your master data mentioned above, you will create your stock in your S/4HANA system by following these ten simple steps:
1. Transaction code MIGO: Goods Receipt Other
Go to transaction code MIGO in your SAP system.
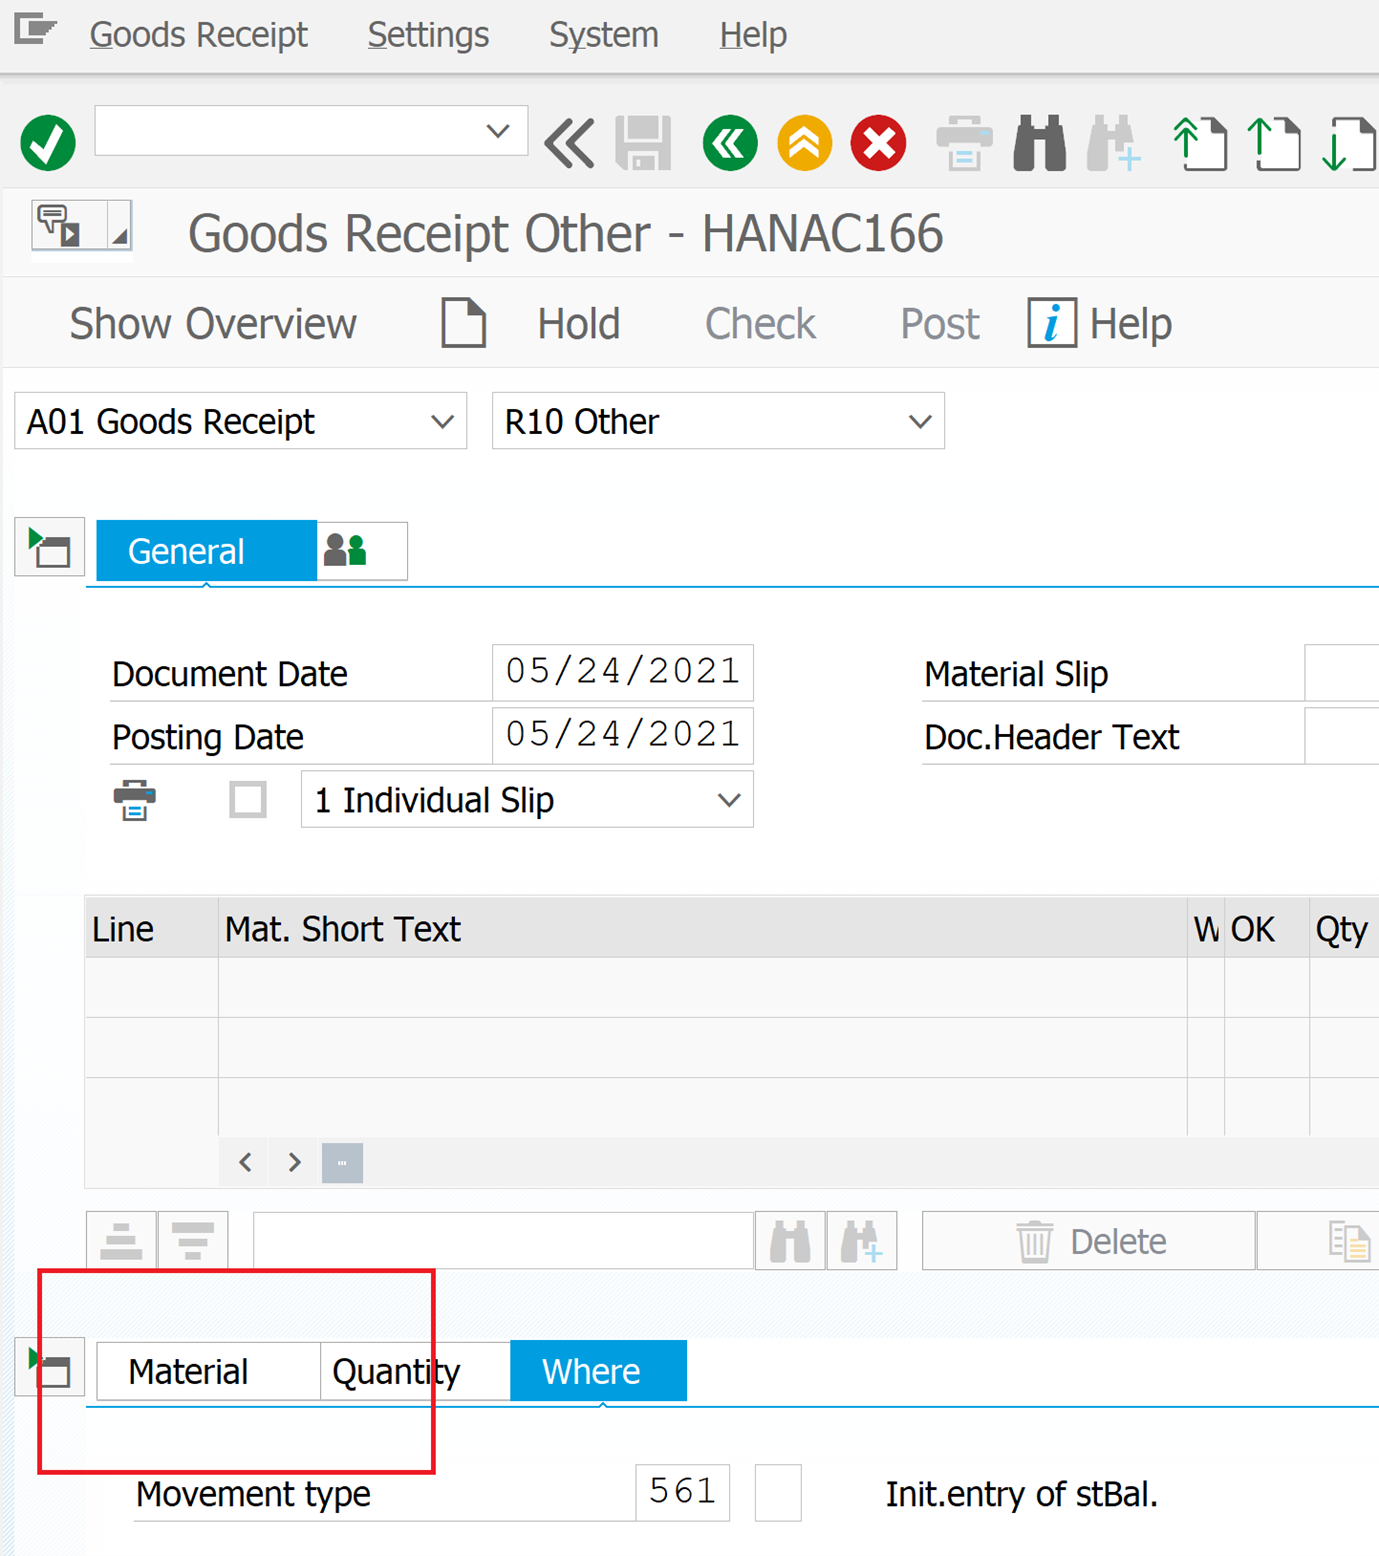
2. Initial fields at top of MIGO screen
Carefully examine the top of your MIGO screen and make sure the top three fields (boxed in red) are set to the following as seen in the screen print below:

The first field on the left is the “Executable Action” field. Make sure this is set to A01 Goods Receipt. Any of the other eleven choices in the Drop List are wrong for this operation so don’t be led astray.
The second field from the left in the screen print above is the “Reference Document” field. Choose the last option R10 Other. The other droids are not the ones you are looking for.
Finally, you will notice the third red box all the way over on the right side which is the “Movement Type” field. The SAP Movement Type to create stock out of thin air is number 561, otherwise identified in the system as “Receipt per initial entry of stock balances into unr.-use.” Put another way, when you create a new company and need to set the initial stock level in the system to the real physical value in the warehouse, you’ll use number 561. Or if you just want to create the stock out of thin air for testing purposes, this will be the one.
3. Material tab at bottom of MIGO screen
After setting those top three values, we’ll go spelunking down to the bottom of the MIGO screen and click the Material tab as seen in in the red box in the screen print below:
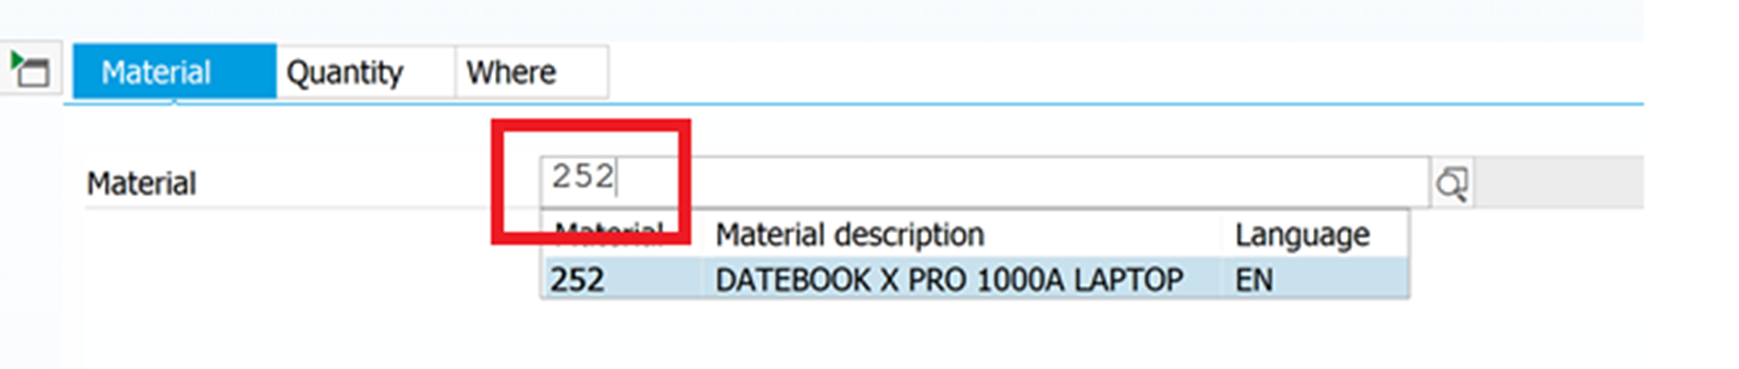
4. Material field in Material tab
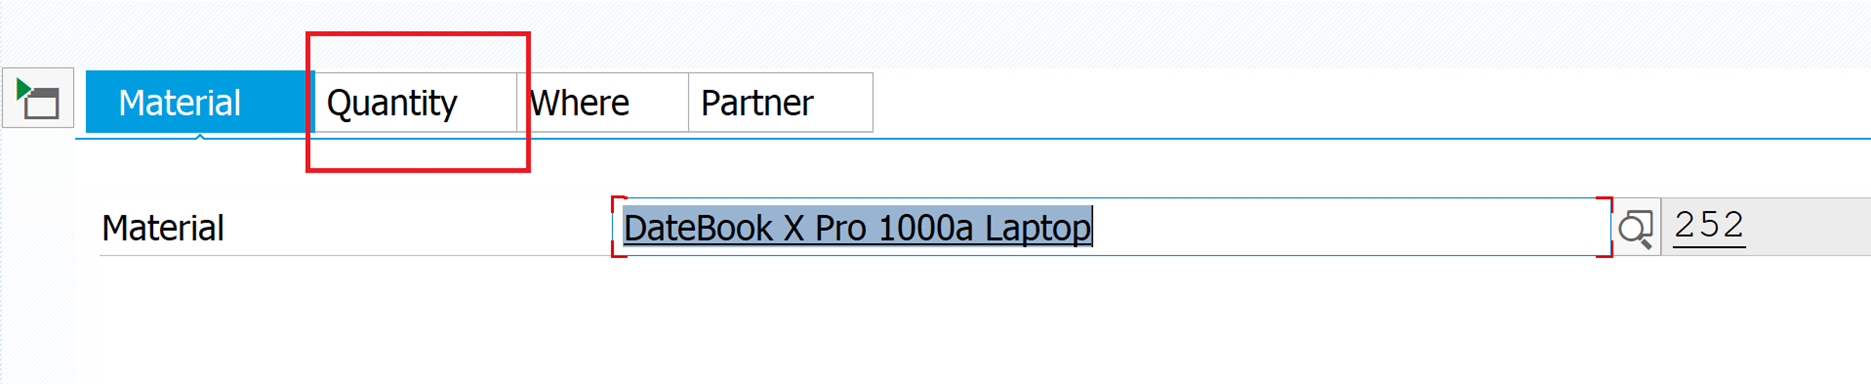
Input the material for which you want to load the inventory level. Note that SAP reads your entry and provides extra details to assist your confirmation that you have selected the right material. Hit enter when done.
5. Quantity tab at bottom of MIGO screen
Now click to select the Quantity tab as boxed below in red:
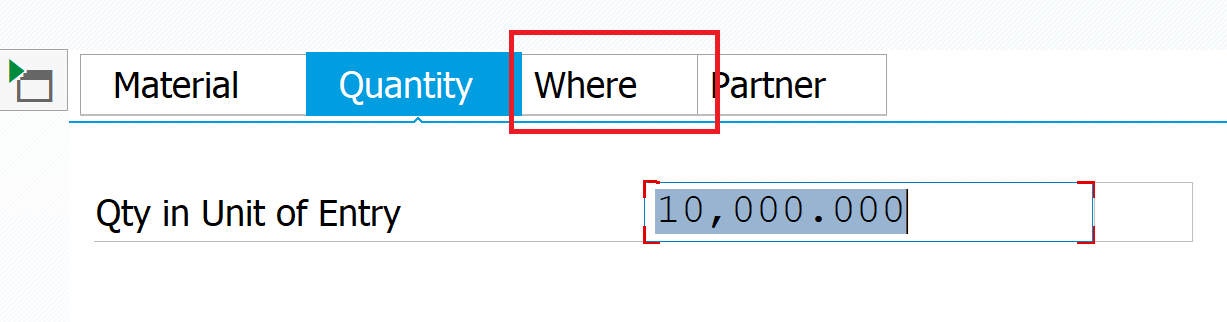
6. Quantity tab at bottom of MIGO screen
Now, input the amount of units by which you want to bump up your inventory. Remember you are creating stock out of thin air. So this is the time to ask yourself, do you think big? Go large my friend. Size matters. I’m going to increase the inventory by 10,000 units, just because I can.
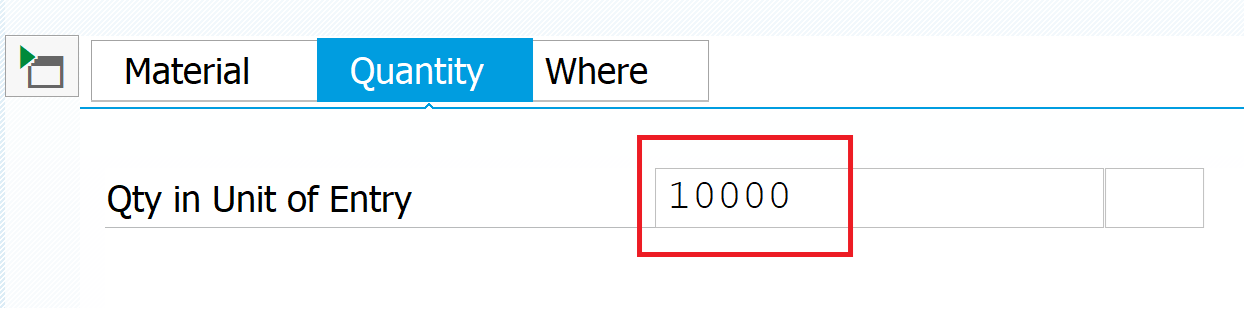
Hit enter.
7. Quantity tab at bottom of MIGO screen
Now click to select the Where tab.
8. Where tab at bottom of MIGO screen
Input the Plant and the Storage location numbers you have created in your config, namely the places where your goods will magically appear. You type this in the Plant and Storage location fields as seen below in red:
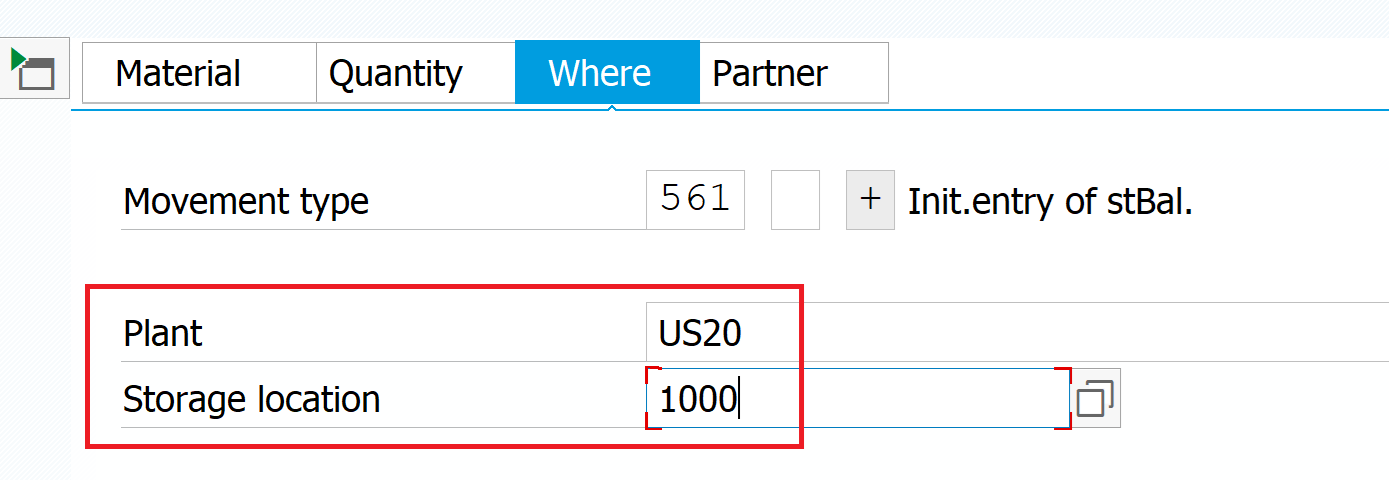
Hit enter and S/4HANA will fill in the name and list the number in the box to the right.
9. Post Goods Receipt at top of MIGO screen
Now the moment of truth has arrived. You have completed the minimum entries required to load stock in your system. What remains is to post it. Find the Post button on the button bar, see below in the red box. Many folks call this an icon. It don’t make no nevermind. Just click it.
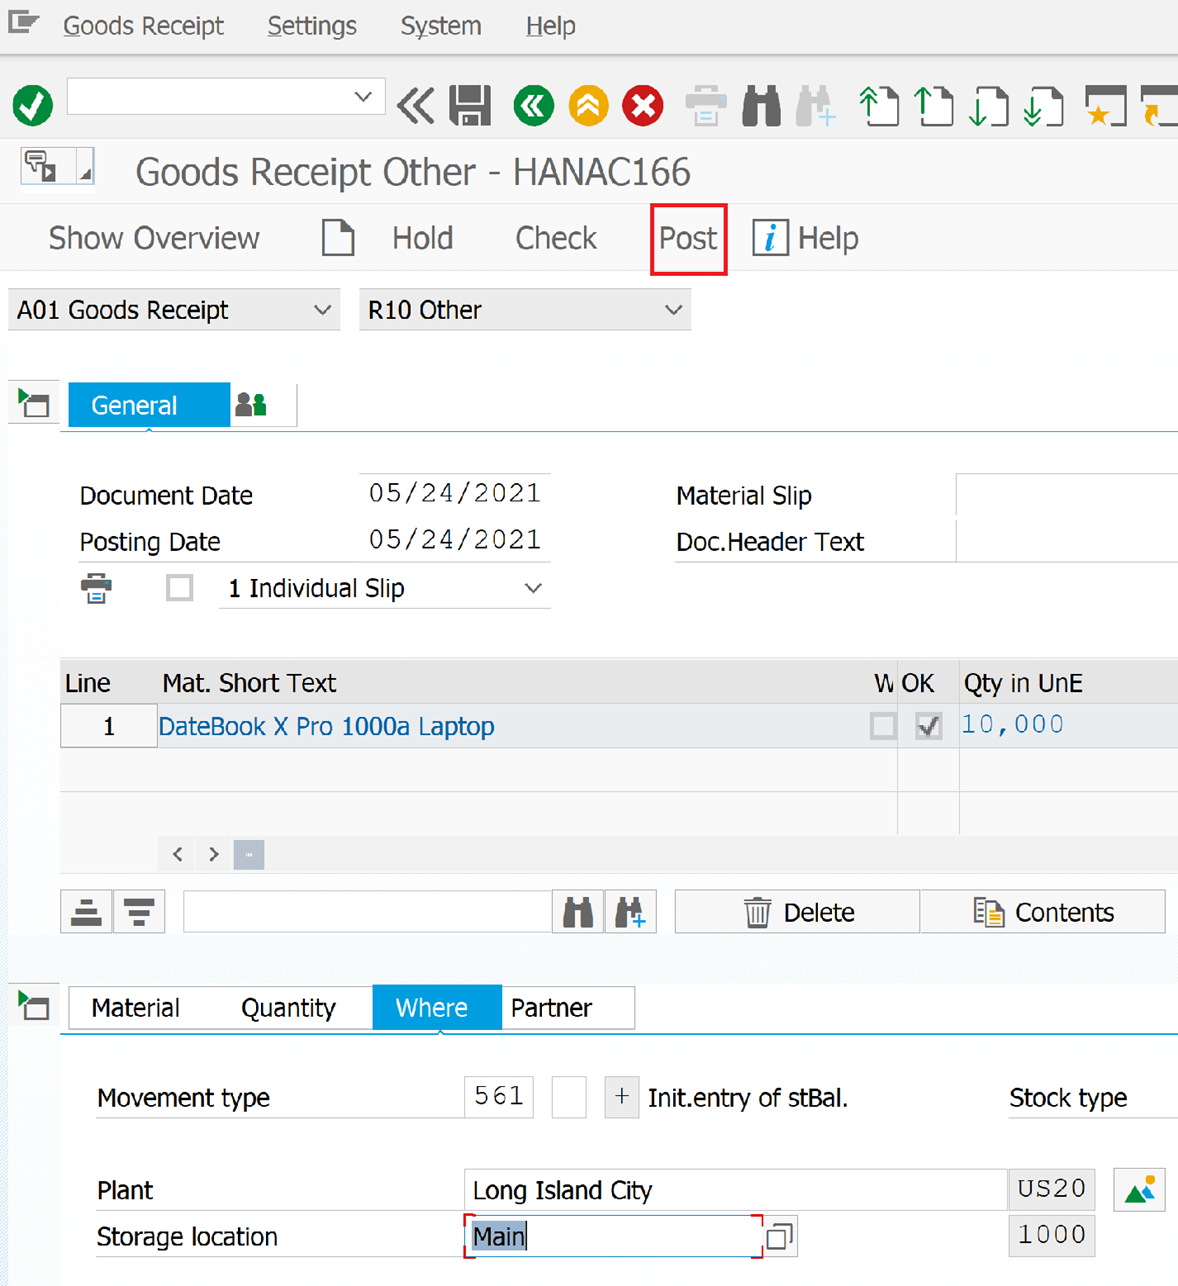
10. Goods Receipt Posted at top of MIGO screen
You can see evidence of your handiwork by referring to the message at the bottom of your MIGO screen circled in red.

You can also go to transaction code MMBE and see that the total stock has increased accordingly.
If you get errors during this step, that is a sign that your config suffers from defects on either the MM or FI side. Contact your MM and FI consultants for help resolving those errors. If no errors, then you are ready to roll with your Sales Orders and Deliveries.
For more information on Order to Cash, please refer to my recently released book, “Sales and Distribution with SAP S/4HANA – Business User Guide,” cowritten by one of the UK’s leading SAP SD consultants Jon Simmonds: https://www.sap-press.com/sales-and-distribution-with-sap-s4hana-business-user-guide_5263/
As a special bonus to EURSAP blog readers, use this code SDEUG15 for a 15% discount!
Author: James Olcott – Senior SAP SD/MM/BOBJ Consultant