Running SAP reports and programs – Creating background jobs in SAP
Running SAP reports and programs – Creating background jobs in SAP.
Running foreground SAP reports and programs is as straight-forward as opening the report and hitting F8 or execute to run. However, sometimes these jobs need to be scheduled to run at certain times of the day, or after other jobs have been finished.
Let’s explore how we go about this, by creating batch jobs to run in the background.
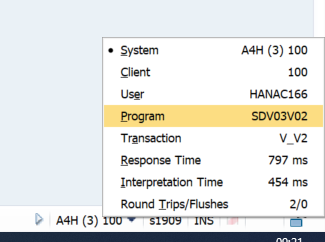
1. The first step is to understand the program name for the report or transaction. You can get to this in the SAP GUI by clicking on the down arrow next to your system ID, as below. For the transaction I am going to use (V_V2), the program name is SDV03V02.
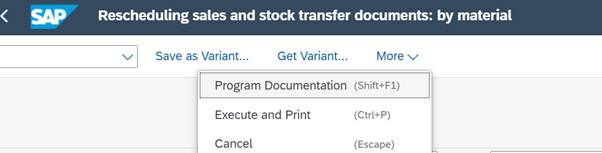
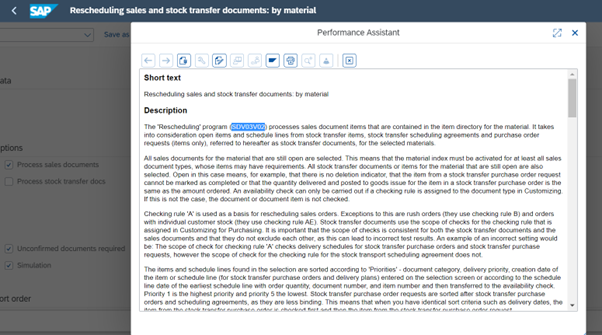
In Fiori, this transaction is app “Rescheduling sales and stock transfer documents by material”. To see the program name, follow the path “More>Program Documentation”, as below.
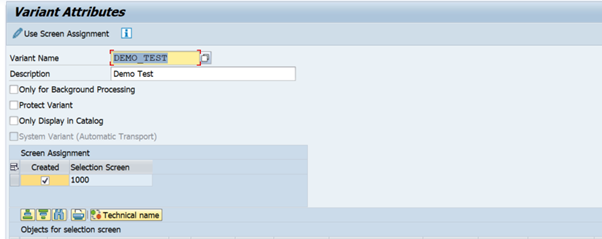
2. Once you have the program name, you will need to create a variant in the transaction. You do this by adding the criteria into the transaction which are relevant and then clicking on the Save button, or in Fiori by clicking the “Save variant” button. In the SAP GUI, this will bring up the below screen, where you give your variant a name and a description (the Fiori equivalent of this screen is identical).
There are additional options available here to:
• Only for Background Processing – restricts the variant so it can only be run in background
• Protect Variant – protects the variant so only the creator (you) can change it
• Only Display in Catalog – this option means that the variant will be saved but will not show as an option in the search help when searching for variants
Further options at this point are available based upon the individual fields. These options are:
• Protect field – the field cannot be changed in this variant.
• Hide field – the field is not displayed in the transaction when using this variant.
• Hide field “TO” – no intervals are allowed for the field. This is only relevant and available for selection where the field is defined as a select option rather than a parameter.
• Save field without values – the value in the variant is overwritten by whatever is added at the runtime of the transaction.
• Switch GPA off – This refers to the SPA/GPA parameters, which are set in ABAP programs. In a program, a value can be passed to another program to run, with a variant. However, if the “Switch GPA off” is checked in the variant, then the values from the program are ignored.
• Required field – it is mandatory to enter a value in this field if this is checked.
• Selection variable / Option / Name of Variable – several options exist for selection variables. To understand how to use these, please refer to our previous Eursap blog post here.
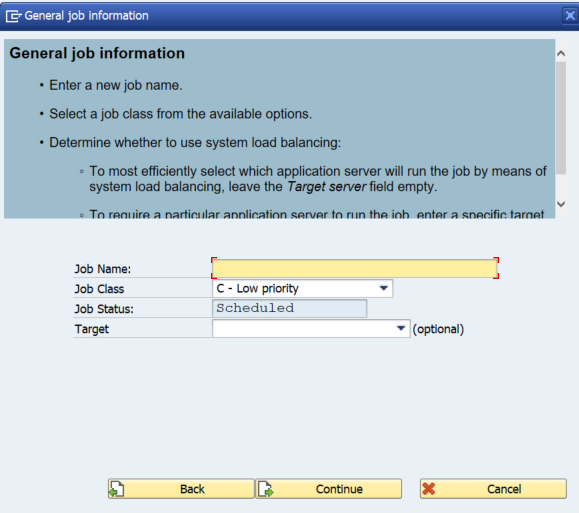
3. Once you have the program name and variant, you are ready to start creating the batch job. This can be done in the GUI in transaction SM36 or in Fiori by using app “Define Job”.
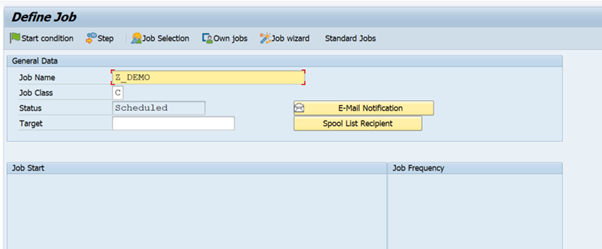
Add a name for your batch job. Normally your organisation will have specific naming conventions which you should follow. I am naming my job “Z_DEMO”.
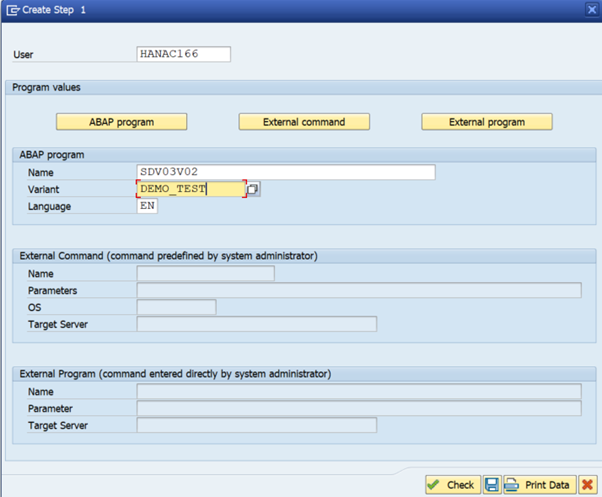
4. You will now need to add the program names to your batch job to allow the job to be run in sequential order. To do this, click on the “Step” button to bring up the below screen.
At this point you will need to add:
• The username which the step should be run under – this is useful if you are using a background user for your batch job – check with your basis department as the background user will need the correct security authorizations to be able to run the program. The name is defaulted to your own username.
• The name of the ABAP program, taken from step 1.
• The variant you saved from step 2.
5. You are then taken to the Step List Overview, where you can keep adding and moving steps into the batch job in the correct sequence.
6. You then need to specify a start time. Options here are:
• Immediate – job runs as soon as you save.
• Date/time – specify a date and a time for the job to run.
• After job – specify an existing batch job which, as soon as it finishes, will trigger your batch job to run.
• After event – specify an existing trigger event (event would be defined by your ABAPer) which should trigger your batch job to run.
• Operation mode – set an operation under which conditions your job should run (e.g. day or night only).
• Additional blue arrow – this allows you to set a factory calendar, workday and time under which to run the job.
For the purposes of my batch job, I will use a date and time setting.
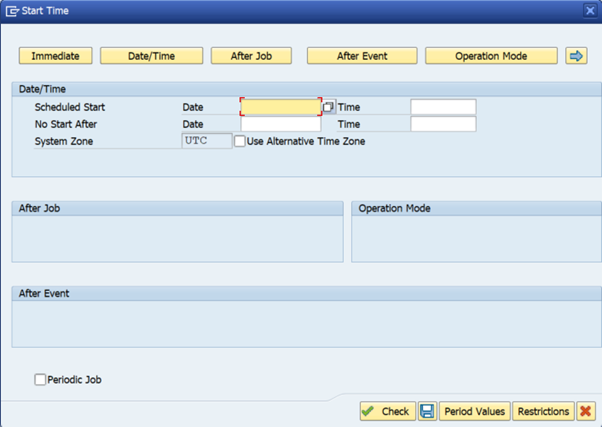
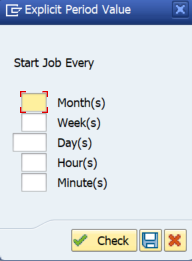
7. The next option is to set the period values, in case you want the job to run as a regular scheduled job. To do this, click on the “Period Values” button at the bottom of the screen.
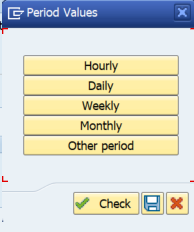
This allows you to specify that the job runs each hour, day, week, or month after the initial start time.
By selecting “Other period”, you can specify alternative periodic rules as below.
By selecting the “Restrictions” button, you can see the start date restrictions available to you.

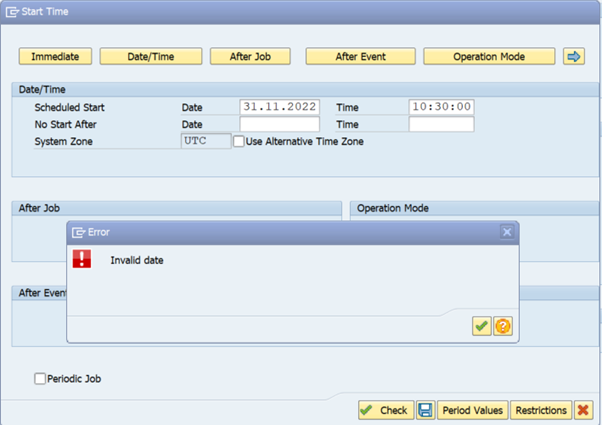
Once you are ready to save the job, ensure you click “Check” to validate all your entries. For example, I have added an invalid date here and clicking “Check” advises me of this.
Once all your parameters are set, click save to return to the main set up screen.
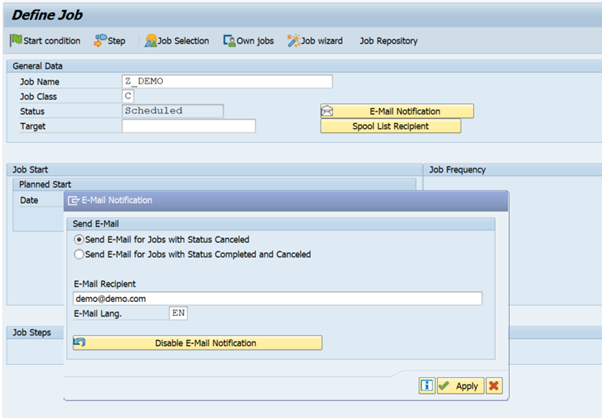
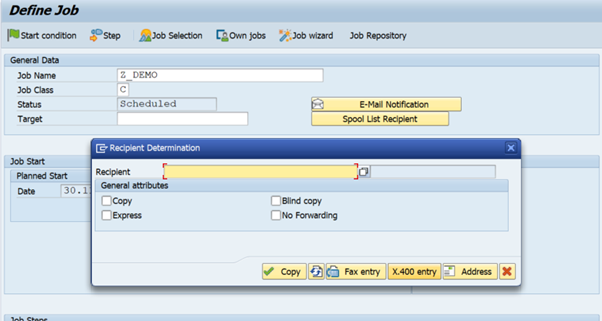
8. Options at this point are:
• Set up an email alert if the job fails, by selecting the “E-Mail Notification” button:
• Set a recipient of the job spool once it has completed by selecting the “Spool List Recipient” button:
Once all your data is created correctly, select the “Save” button to commit your job to run.
Alternatively, a good option for creating your batch job is to use the Job Wizard to guide you through creating the batch job.
9. At this point, now your job has been created and submitted, you can navigate to the list of batch jobs in the system by selecting:
• Job Selection – shows all batch jobs in the system
• Own Jobs – shows only the batch jobs created under your name
To display, batch jobs in the system, you can also use the following methods:
• Transaction SM37
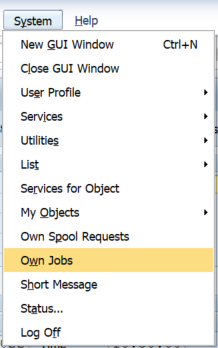
• Menu path in SAP GUI System>Own Jobs
• Menu path in Fiori: More>System>Services>Jobs>Job Overview:

• Fiori app “Simple Job Selection”
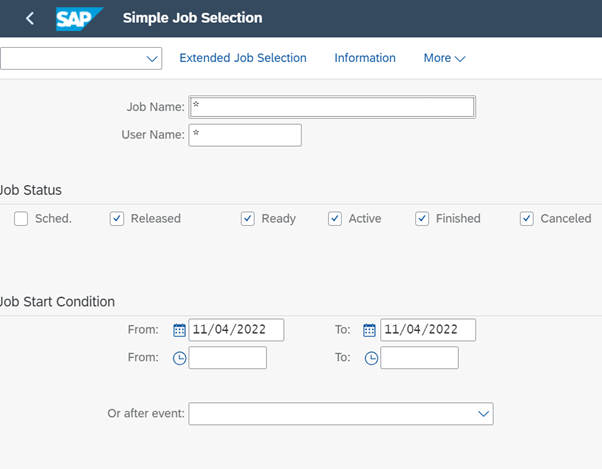
10. From SM37/Simple Job Selection app, you can see the list of jobs created by you, along with the status, start date and time and duration.

Other options available here are to view the steps in the job, the spool file if created, and the job details.
Author: Jon Simmonds, IT Director, Architecture