Eursap's SAP Tips: Creating customers as business partners in S/4HANA with the same number
Eursap's SAP Tips: Creating customers as business partners in S/4HANA with the same number.
With the introduction of SAP S/4HANA, back in 2015, the default business object for customers (and vendors) became Business Partners. This made sense, as one organisation or person could effectively play multiple roles. However, this also meant that we now have, for one customer, two objects: the traditional “customer” object, with entries in tables like KNA1 and KNVV, as well as a business partner object, with entries in tables such as BUT000.
This has caused many ECC6 consultants to have to learn new processes and new steps to achieve efficient creation and migration of customer master data from ECC6 to S/4HANA.
One of the pain points here is that by default, the customer number created in S/4HANA is not the same as the BP number. This causes confusion for clients.
There are some simple steps you can take to avoid this situation and ensure that your customer number and your BP number are always the same.
Let’s look at this series of tips to help out here.
Tip 1: Assigning number ranges for business partners
Number ranges are assigned to business partners through the roles and role groupings. To set up new roles, follow these steps:
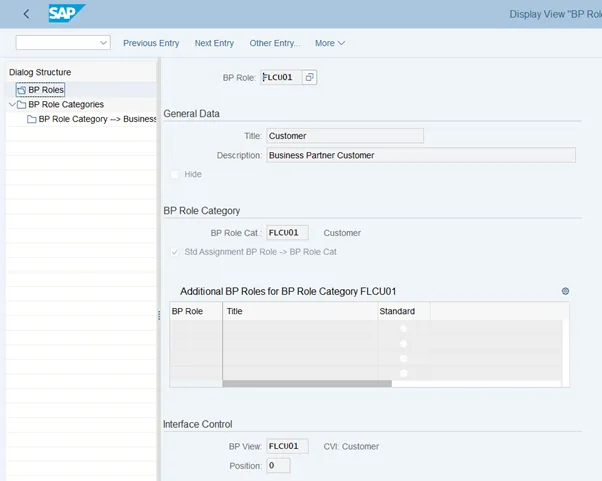
1. Set up your roles, or familiarise yourself with the standard roles if you are using those. Follow the IMG path:
Cross application components> SAP Business Partner>Business Partner>Basic Settings>Business Partner Roles>Define BP roles
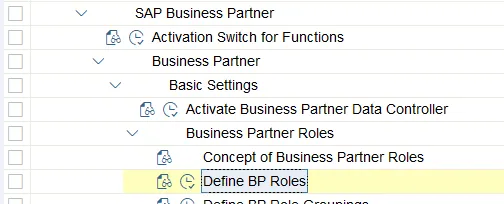
Example here:
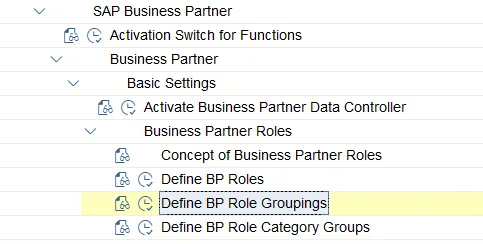
2. Once you are familiar with the role, you will need to define the BP grouping which that role appears in. This is used to share configuration across more than one role. To do this, follow this path: Cross Application Component>SAP Business Partner>Business Partner>Basic Setting>Business Partner Roles>Define BP Role Groupings.
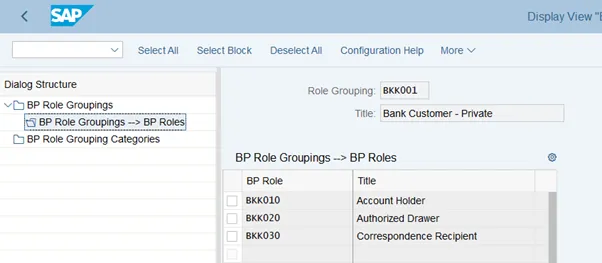
Roles are assigned to groupings in the menu option BP Role Grouping–>BP Roles. Please see below for example:
3. Now your grouping is created, you can create your number range for your BP. The number range you create should be internal so do not tick the “External” check box”. Follow this IMG path: Cross Application Components>SAP Business Partner>Business Partner>Basic Settings>Number Ranges and Groupings>Define Number Ranges
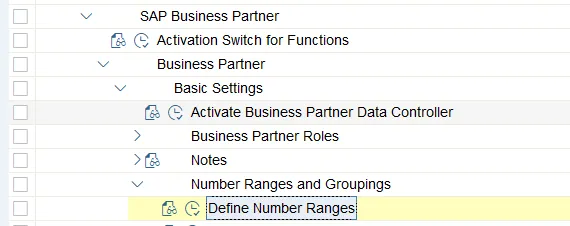
4. Once you have created your number range, you need to assign your BP grouping to that number range. Again, do not mark as external. To do this, follow this IMG path: Cross Application Components>SAP Business Partner>Business Partner>Basic Settings>Number Ranges and Groupings>Define Groupings and Assign Number Ranges.
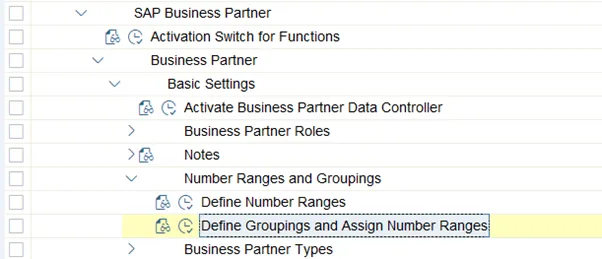
Examples are below.
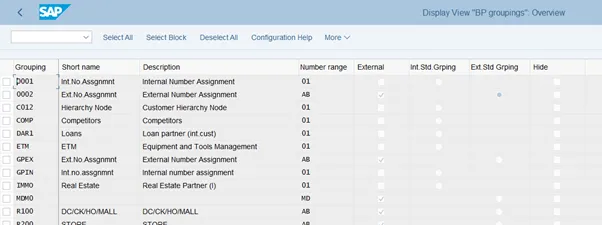
Your number range is now correctly assigned to your BP.
Tip 2: Assigning the same number range to your customers
1. First you must create your customer account group or familiarise yourself with the standard ones if you are to be using them. Follow this IMG path: Financial Accounting>Accounts Receivable and Accounts Payable>Customer Accounts>Master Data>Preparations for Creating Customer Master Data>Define Account Groups with Screen Layout (Customers)

2. Now you must create your number range. This should be the same as the BP number range you have already created, except it must now be marked as “External”. This is because the number for the customer is being defined by an external object (the BP). To do this, follow this IMG path:
Financial Accounting>Accounts Receivable and Accounts Payable>Customer Accounts>Master Data>Preparations for Creating Customer Master Data>Create Number Ranges for Customer Accounts.
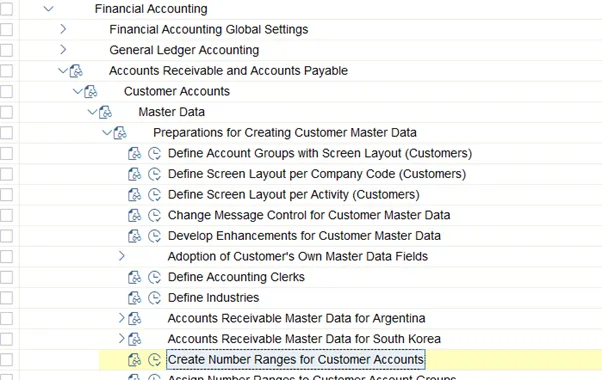
3. The number range for customers must be assigned to the individual account groups you created or viewed in step 1. You need to maintain the number range and check the External field. To do this, follow this IMG path:
Financial Accounting>Accounts Receivable and Accounts Payable>Customer Accounts>Master Data>Preparations for Creating Customer Master Data>Assign Number Ranges to Customer Account Groups.
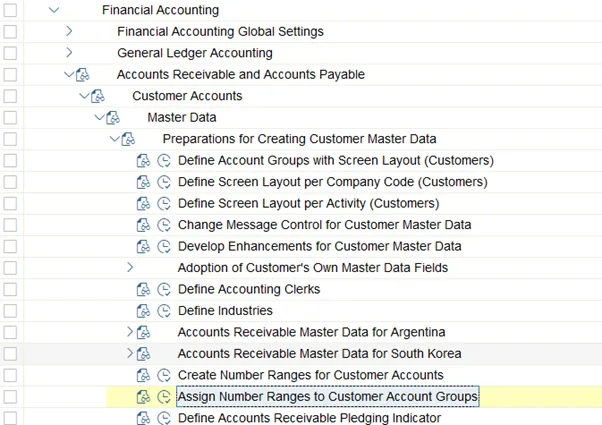
Your number range is now also assigned to your customer group.
Tip 3: Ensuring both customer and BP number ranges are the same
Now for the magic! Getting the BP creation number automatically to populate the customer tables with the same number. For this, we are returning to our Cross Application Components menu path. Here, we need to maintain our number range assignment for “Direction BP to customer”. In other words, every time a BP is created, it assigns the same number to the customer. To do this, maintain the “Same number range” check box in this IMG path:
Cross Application Components>Master Data synchronization>Customer/Vendor Integration>Business Partner Settings>Settings for Customer Integration>Field Assignment for customer Integration>Assign Keys>Define Number Assignment for Direction BP to Customer
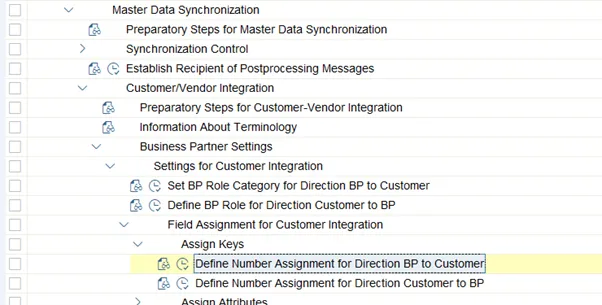
Examples below:
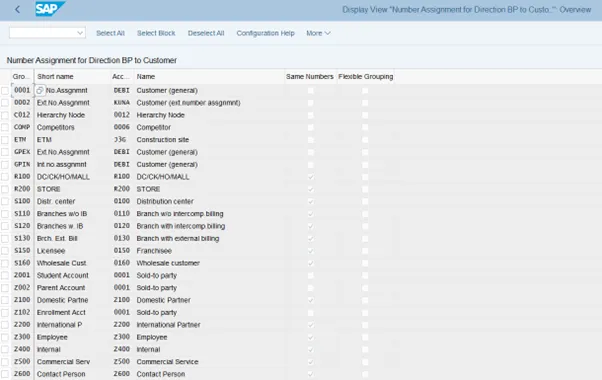
Tip 4: Seeing the different object numbers for BP, customer and supplier
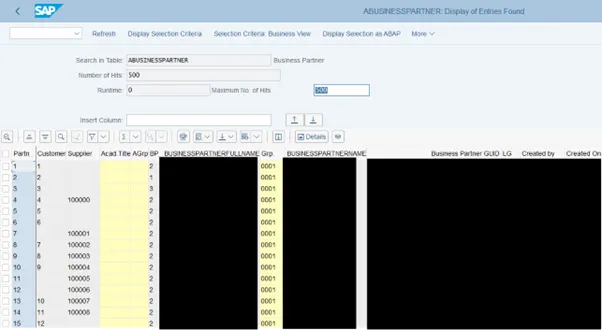
Sometimes your organisation may insist on using different number ranges for BP and customer or supplier. It could be that suppliers all have different numbers, but customers have the same BP number, for example. This is the case in the SE16N table screenshot below.
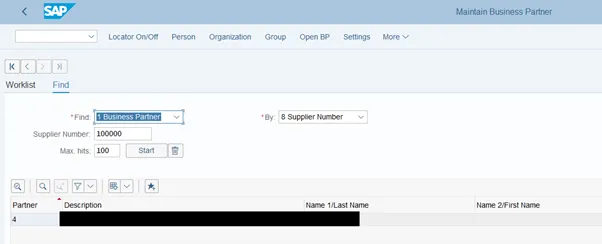
To find the different numbers, there are a couple of ways. The easiest way is to use transaction BP and select “*By” as the customer or supplier:
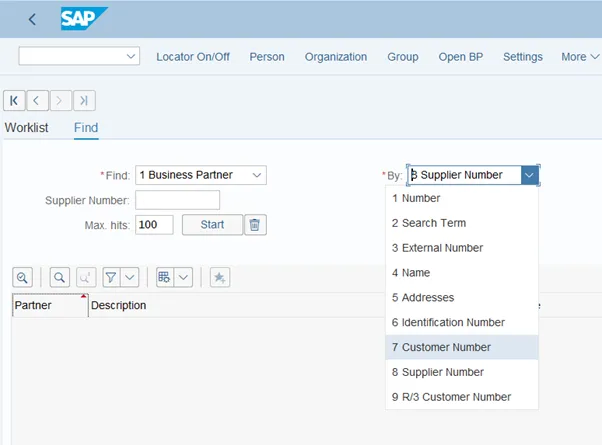
Once this is selected you can see the BP number. In the example below, I am looking at supplier number 100000 and wanting to find the BP number, which returns BP number 4.
A further useful way is to use the table browser SE16N and look at table ABUSINESSPARTNER, as below.
I hope you find this useful. Stay tuned for another SAP Tip from Eursap next month.
Be sure to also check out Eursap’s SAP Blog for more in depth articles.